1. Gestion de projet et documentation#
1. Gestion de projet et documentation#
The first module of this course was about cloning a git repositeory, create an ssh key and use md files to create the documentation.
At the begining of the course I started with using the linux part of my computer. I then, on the project part of the course, switch on windows when i realised i was more using the programs on windows.
the first part of this doc is explaining how to do all of that in linux and then i explain how to do it on windows.
Linux#
ssh key#
This guide will walk you through the process of cloning a Git repository using SSH and creating an SSH key for authentication. SSH keys provide a secure way to access and interact with remote Git repositories.
This page will explain how i clone my git repository and create an SSH key for authentication.
“An SSH key is an access credential for the SSH (secure shell) network protocol. This authenticated and encrypted secure network protocol is used for remote communication between machines on an unsecured open network” Atlassian
Step 1: Check for Existing SSH Keys#
Before generating a new SSH key, check if you already have one. Open your terminal and run the following command:
ls -al ~/.sshI did’nt have an SSH key, i had to generate one
Step 2: Generate SSH Key#
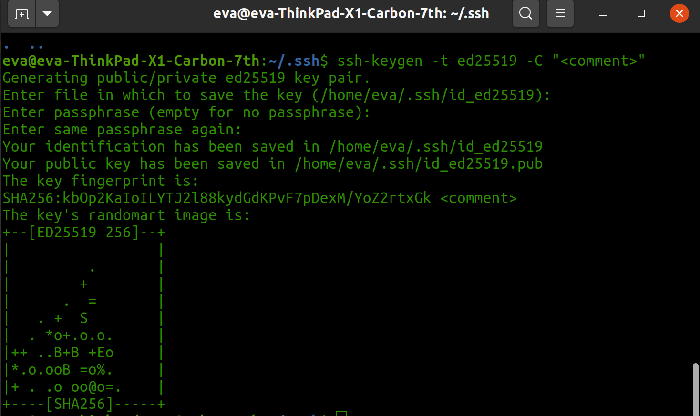
I generate one using the ssh-keygen command. You can use the default settings by pressing Enter for all the prompts, or customize your key by specifying options like the key type and a passphrase.
ssh-keygen -t ed25519 -C "<comment>"Step 3: Copy Your Public Key#
I then copied my public key to my clipboard so i can add it to Gitlab. I just printed the key to the terminal and copied it manually
Step 4: Add Your SSH Key to Git Hosting Service#
On Gitlab, I went to my accound settings, on the SSH key section. Where I’ve add my public key
Step 5: Clone a Git Repository#
Now that my SSH key is set up, I can clone a Git repository using SSH.
git clone git@gitlab.com:fablab-ulb/enseignements/2023-2024/fabzero-experiments/students/eva.dubar.gitNow that I cloned the git repository as a local copy on my computer, i can edit my website on my favorite IDE, offline and then i can tell the internet that i’ve changed my files on my computer and the internet would updates those files accordingly. There is some specifics commands to say that to the internet :
git add .
git commit -m "message to future me to say which files i've changed"
git pushWindows#
Pour la version windows je vais continuer en français (c’est les effets secondaires d’avoir des cours en plusieurs langues et un dual boot)
Creer une clé SSH#
Je n’avais pas de clé SSH dans mon windows, j’en ai donc crée une. Cette étape est la même que pour linux. J’ai donc ouvert mon terminal dans C:/user/evadu j’ai lancé la commande
ssh-keygen -t ed25519 -C "windows"La clé SSH c’est enregistrée dans c:user/evadu/.ssh/id_ed25519. Pour uploader la clé sur gitlab, j’ai voulu copier là clé. Pour une raison que je connais pas, lancer la commande pour ouvrir la clé publique depuis le terminal ne marche pas, j’ai donc lancé la commande depuis le git bash :
cat ~/.ssh/id_ed25519.pub | clipA ce moment là clé est copiée dans mon presse-papier (ctrl C, ctrl V), il suffit donc juste de la coller dans gitlab:
Et voilà! je peux maintenant clone, push, commit et pull, de la même manière que sur linux (expliquée plus haut en anglais), depuis la partie windows de mon ordi.
Modifier le site#
I used Visual Studio Code in windows and Atom in linux to modify the markdown files locally on my computer.
I decided to change the theme of my website to bootstrap386 but the side navbar and the main text were going on top of each other. I then decided to make some change on the theme by adding an extra.css file. (I might have got carried away and changed a lot from the original theme). 
Pour pouvoir voir mes changements sans devoir add+commit+push et forcer la pipeline sur le site web, je compile le site localement sur mon ordinateur. Pour ce faire j’ai juste a lancer la commande
mkdocs builddans le terminal, à l’endroit du site. Celle ci permet de compiler les fichier .md en .html, ce qui m’est très utile pour pouvoir débeugger, les fichiers css par exemple ou les liens avec les images.
Réduire les tailles des images#
Pour garder l’espace de stockage assez bas sur le site web (et pas utiliser un grand nombre de serveurs pour garder toutes mes images), c’est important de réduire les tailles des images. Pour me faciliter la vie, j’ai choisi d’utiliser image magick. Pour réduire plusieurs images d’un coup dans un seul folder, j’exécute la commande
magick *.png -resize 400 *.pngGestion de projet#
Dans l’optique d’être le plus efficace possible et de ne pas se laisser avoir par une montagne de travail, voici quelques techniques de gestions de projets qui pourait m’être super utiles trouvées (qui m’auraient été super utile, mais me voilà encore la veille du rendu à écrire ces lignes) ici:
- Décomposition en tâches :
- Diviser le projet en tâches plus petites et abordables.
- Hiérarchisation des tâches :
- Classer les tâches par ordre d’importance, en commençant par les plus importantes.
- Gestion de projet en spirales :
- Créer rapidement une première version minimale fonctionnelle.
- Évoluer progressivement en ajoutant des fonctionnalités par étapes successives.
- Gestion du temps plutôt que des tâches :
- Fixer des délais pour chaque tâche.
- Allouer des créneaux horaires en fonction du temps disponible.
- Passer à la tâche suivante même si la précédente n’est pas parfaitement aboutie.
- Triage des tâches en cas de dépassement :
- Réévaluer les tâches restantes en fonction du temps et des ressources disponibles.
- Reporter ou annuler certaines tâches pour s’adapter à la réalité du projet.
Ayant un (trèèèès) grand nombre de travaux à rendre cette année, je m’empresserai de tester tous ces conseils. (In fact, she did not, and did everything the day before the deadline, as usual)